I think they can be dismantled and also adjusted spring wise, mine give just enough assistance to make the bonnet light, but they don't force it at all.
Shaun.
115/2943 work in progress
Re: 115/2943 work in progress
Last edited by taximan on Tue Mar 22, 2016 10:05 am, edited 1 time in total.
VAUXHALL VISCOUNT 1969
MB W213 220D
MB E Class Cabriolet
JOC Member 9052
MB W213 220D
MB E Class Cabriolet
JOC Member 9052
-
grottenolm
- Posts: 195
- Joined: Mon Mar 17, 2014 5:14 pm
- Location: Frankfurt, Germany
Re: 115/2943 work in progress
I only use one since the upper end of the second bonnet lifter is always touching the lower mounting point of the bonnet "stay". I am not sure if this was really intended, but in one of your pics it looks the same.
Interceptor MK2
Re: 115/2943 work in progress
I opened one up and the spring rate can be in- or decreased by the nut on the main shaft. So I will try to get a better assistance.
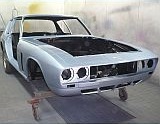
The work always takes longer than expected. All Hardura work has been finished now, the heater motor box has been removed - de rusted, repainted and clad in Hardura again.
Radiator has been (air pressure) cleaned, painted and is ready to fit. I have just received two new old stock Lucas 6RA relais which will be fitted in the new relay box.
- WP_20160322_004.jpg (170.76 KiB) Viewed 5651 times
The future ain’t what it used to be.
Interceptor Mk1 LHD & RHD
GT LHD
Interceptor Mk1 LHD & RHD
GT LHD
Re: 115/2943 work in progress
Had some fun with the relay box and re-attaching wires. The alternator relay is not needed anymore (I fitted the famous Mitsubishi alternator), I will use it for the headlamps.
One interesting find - a loose wire. Black with a green stripe. It exits out of the original wiring loom for the fuse box, along with two white wires and a brown/white one. I cannot remember where it fitted to, also cannot find it in the wing diagram. Any ideas?
One interesting find - a loose wire. Black with a green stripe. It exits out of the original wiring loom for the fuse box, along with two white wires and a brown/white one. I cannot remember where it fitted to, also cannot find it in the wing diagram. Any ideas?
- Attachments
-
- WP_20160403_004.jpg (105.05 KiB) Viewed 5573 times
The future ain’t what it used to be.
Interceptor Mk1 LHD & RHD
GT LHD
Interceptor Mk1 LHD & RHD
GT LHD
orange box location
I am going to install the new distributor and orange box electronic ignition system next weekend. In the instructions it is recommended to mount the orange box not in a hot place, away from the exhaust system.
There is a convenient space below the relay box, above the shock absorber on the inner wing. But this would still be a relatively hight temperature area. Another option is to mount the box next to / just in front of the radiator on top of the inner wing. This would be much cooler I think.
Where is the box usually mounted (on Mk3 Interceptors) or what would be the best place?
The future ain’t what it used to be.
Interceptor Mk1 LHD & RHD
GT LHD
Interceptor Mk1 LHD & RHD
GT LHD
-
Dino Fritz

- Posts: 457
- Joined: Thu Feb 16, 2006 1:33 pm
- Location: Adelaide, South Australia
Re: 115/2943 work in progress
On a RHD Mk III Interceptor, the orange box is located in front of the radiator but behind the radiator grill on the RHS.
Cheers, Dino
Cheers, Dino
Jensens.........when does it ever end!
Re: 115/2943 work in progress
Thanks Dino, I will fit the box at the same location.
Today I found the reason for the very slow electric windows. The previous owner said they never worked well and that maybe I should get new motors.
Looking through the Service Bulletins book, there was this SB which stated that the help springs were incorrectly fitted for chassis 2926 - 2961. My car is 2943.
So I looked at the spring and yes - fitted upside down.
Amazing that it seems to have been this way for all these years - since new?! My car had new doors fitted 20 years ago, but they fitted the old internals - copying the error.
Pic is of the LH door.
- WP_20160410_007.jpg (69.82 KiB) Viewed 5449 times
- WP_20160410_005.jpg (73.19 KiB) Viewed 5449 times
The future ain’t what it used to be.
Interceptor Mk1 LHD & RHD
GT LHD
Interceptor Mk1 LHD & RHD
GT LHD
Re: 115/2943 work in progress
Amazing find Dion! When I dismantled my car the windows on 2950 were very slow, too. I thought hardened grease, rust or deteriorated window-channels or all of them were the reason. But I will have a look at the springs next time I'm at my garage... 

Edit: Cheered too soon. Didn't have to go to my garage. I found this pic
So hardened grease, rust and deteriorated window channels
Edit: Cheered too soon. Didn't have to go to my garage. I found this pic
So hardened grease, rust and deteriorated window channels
- P1070581.JPG (131.6 KiB) Viewed 5438 times
1968 Interceptor MK1 115/2950 (See full restoration-story: http://www.interceptor-mk1.de)
1967 Interceptor MK1 117/2609 R.I.P †
BMW 550iAT (lpg)
BMW 120d
JOC-Member 9838
1967 Interceptor MK1 117/2609 R.I.P †
BMW 550iAT (lpg)
BMW 120d
JOC-Member 9838
Re: 115/2943 work in progress
My drivers window still is slow.... and not able to complete the top 10 centimeters or so.
The spring was upside down so I corrected that. The window gear was very worn so bought replacement wheels - except they are not the same but slightly different. But the main thing is that the number of tooth on the wheel is different. It does not correspond with the worm of the motor so I had to reinstall the old wheel.
Lubricated the window rails (sprayed with silicone) but the effect still is not good enough. Testing was done on the battery only. My hopes are it might improve with a running engine which has the upgraded 9 amp alternator.
The future ain’t what it used to be.
Interceptor Mk1 LHD & RHD
GT LHD
Interceptor Mk1 LHD & RHD
GT LHD
Timing issues?
The engine ran well before I got to work with it 
I have changed the timing gear from nylon to steel, cleaned the oil pickup gauze, replaced the water pump which leaked, replaced the alternator with a 90 amp one & have changed the wiring for this, replaced the old points distributor for a new one with electronic ignition (the standard orange box), new HT leads and new plugs.
Made sure all electrics are OK now (had to replace a few shortcuts done by the previous owner). Blue wire from the ECU to the plus side of the (new) coil via the (new) ballast resistor. Original white cable from the car also via the ballast resistor. The white/red original wire from the car direct at the plus. Black wire from the ECU to the negative side of the coil. I checked that the car wiring is OK - the white has power when in running mode, the white/red has power when the starter turns.
There is fuel at the carb.
But - the engine will not start. Coughs and splutter at the carb, a spectacular big squirt of fuel out off the inlet of the carb, flames even.
Timing not correct?
I removed the plug (LH front no 1 cylinder) and put a hard wire in it. The PO had made a hole at 5:00 o'clock in the bell housing, very handy to put a screwdriver in so you are able to rotate the gear on the flex plate by the screwdriver. I turned the engine until I felt the piston was at its highest. Removed the rocker cover, and both inlet and outlet rockers can be wiggled for cyl 1.
Looked at the timing mark, see pic - 5 degrees BTC. Knowing the TDC was done by feeling so I felt this was pretty good near TDC.
But the distributor rotor does not point roughly at 4:30 but more like 5:30, see pic. I had put the HT lead for the first cylinder to roughly the 5:00 o'clock position.
Any ideas what to check first?
Should I try to move the HT leads one to the next anti clockwise? Should I turn the distributor body a little - clockwise or anti clockwise?
Maybe put a tooth wrong on the camshaft gear?
I have changed the timing gear from nylon to steel, cleaned the oil pickup gauze, replaced the water pump which leaked, replaced the alternator with a 90 amp one & have changed the wiring for this, replaced the old points distributor for a new one with electronic ignition (the standard orange box), new HT leads and new plugs.
Made sure all electrics are OK now (had to replace a few shortcuts done by the previous owner). Blue wire from the ECU to the plus side of the (new) coil via the (new) ballast resistor. Original white cable from the car also via the ballast resistor. The white/red original wire from the car direct at the plus. Black wire from the ECU to the negative side of the coil. I checked that the car wiring is OK - the white has power when in running mode, the white/red has power when the starter turns.
There is fuel at the carb.
But - the engine will not start. Coughs and splutter at the carb, a spectacular big squirt of fuel out off the inlet of the carb, flames even.
Timing not correct?
I removed the plug (LH front no 1 cylinder) and put a hard wire in it. The PO had made a hole at 5:00 o'clock in the bell housing, very handy to put a screwdriver in so you are able to rotate the gear on the flex plate by the screwdriver. I turned the engine until I felt the piston was at its highest. Removed the rocker cover, and both inlet and outlet rockers can be wiggled for cyl 1.
Looked at the timing mark, see pic - 5 degrees BTC. Knowing the TDC was done by feeling so I felt this was pretty good near TDC.
- WP_20160529_001.jpg (70.96 KiB) Viewed 5360 times
- WP_20160529_003.jpg (70.85 KiB) Viewed 5360 times
Should I try to move the HT leads one to the next anti clockwise? Should I turn the distributor body a little - clockwise or anti clockwise?
Maybe put a tooth wrong on the camshaft gear?
The future ain’t what it used to be.
Interceptor Mk1 LHD & RHD
GT LHD
Interceptor Mk1 LHD & RHD
GT LHD
-
Manwithaplan

- Posts: 341
- Joined: Fri Sep 27, 2013 3:10 pm
- Location: Dawlish, UK
Re: 115/2943 work in progress
Hi Dion
I've just checked my distributor alignment and maybe there is a small discrepancy with your alignment in comparision to mine. With my timing mark in the same position and both Cylinder 1 valves free to move.

My vacuum pot is in a slightly different position to yours.

I've just checked my distributor alignment and maybe there is a small discrepancy with your alignment in comparision to mine. With my timing mark in the same position and both Cylinder 1 valves free to move.
My vacuum pot is in a slightly different position to yours.
Restoration project vehicle Interceptor 115/ 3213
I'm not crazy, my mother had me tested.
The name is Mike, another Mike.
I'm not crazy, my mother had me tested.
The name is Mike, another Mike.
Re: 115/2943 work in progress
Can the distributor be mounted 180 degrees out of alignment on these engines? I did this with a V6 motor once and got the exact issue you're describing.
72 MkIII Interceptor 133/5613 (440)
71 MkIII Interceptor 133/5546 (383)
55 Nash Metropolitan
JOC Member 9777
71 MkIII Interceptor 133/5546 (383)
55 Nash Metropolitan
JOC Member 9777

Re: 115/2943 work in progress
Yes, that's possible. If in doubt it's best to put cylinder 1 on TDC then put in/change dizzzy position so that the rotor points towards cylinder 1.
Learned the hard way.
Learned the hard way.
1973 Interceptor Mk. III
1976 Interceptor Mk. III Convertible
1976 Jensen GT
Jaguar E-type OTS
Triumph TR4A
1976 Interceptor Mk. III Convertible
1976 Jensen GT
Jaguar E-type OTS
Triumph TR4A
Re: 115/2943 work in progress
Window Lifters: Had the same problem on a 1985 Saab 900: The spring was broken. Just attaching a new spring didn't help. The solution was to wind up the spring some turns so it is preloaded  . Ideally the spring force makes up for the majority of the weight of the glass and lifter mechanism so the electric motor has just to move the glass against the friction in the window channels.
Caution when preloading the spring - there is quite a lot of force at work, don't get vital body parts in the way of a spring that is snapping off its mounting points !
!
Additionally just look for the voltage at the motor when applying the switch. In a lot of old cars cable connectors are corroded and a feeble 9 volts are making their way to the motor
Caution when preloading the spring - there is quite a lot of force at work, don't get vital body parts in the way of a spring that is snapping off its mounting points
Additionally just look for the voltage at the motor when applying the switch. In a lot of old cars cable connectors are corroded and a feeble 9 volts are making their way to the motor
Re: 115/2943 work in progress
Always wondered why Jensen did not make the middle locker high enough to be used as an arm rest. The locker lid is already padded.
So I took a couple of books to determine a good height and got to it. Unscrewed the two chrome hinges. Four pieces of wood screwed together, nailed some spare leather I had lying around to it. One of the virtues of having a black interior is that there are no troubles in matching the colour! Then fixed four lengths of steel strip to the inside so it would grip to the inner existing box, and screwed the chrome hinges to the top.
It will not win the concours but my car was and will never be concours (paint and chrome not good enough and the panel gaps would frighten off any judge) but it is perfect and comfortable when driving.
- 20230423_145741.jpg (106.61 KiB) Viewed 256 times
The future ain’t what it used to be.
Interceptor Mk1 LHD & RHD
GT LHD
Interceptor Mk1 LHD & RHD
GT LHD