
Now finished putting all the photos of the bodywork restoration on photobucket follow the link if you wish to view them.
http://s1119.photobucket.com/albums/k62 ... storation/" onclick="window.open(this.href);return false;
Restoration of 128/4430
Re: Restoration of 128/4430
Dave Pearce
Oily Rag Classics
Jensen FF 119/133
Jensen FF 119/182
Jensen Interceptor III 128/4430
Oily Rag Classics
Jensen FF 119/133
Jensen FF 119/182
Jensen Interceptor III 128/4430
-
PaulMcElhinney
- Posts: 3684
- Joined: Sun Aug 10, 2008 8:52 pm
- Location: Halesowen, West Mids
Re: Restoration of 128/4430
A great resource Dave, well done.
Paul McElhinney - Mk I 115/3309 in Positano yellow, FF Mk II 127/289.
Re: Restoration of 128/4430
The last part is now cleaned and zinc primed so thats the end of cleaning the shell. I have now booked the car in for paint so its a mad rush to get all the bits finished before it can go.
Im looking forward to a clean painted shell as then the reassembly can start which is the best part of the project, although there are still lots of parts that require rebuilding and painting before being fitted.


I will try to get the hard to reach areas with my small spray gun when this paint has had a day to dry and if there are any bits left then I will have to resort to a brush.
Next on the list is get the axle back together, hopefully the shims will arrive soon, we were only going to replace the hub bearings but decided at the last minute that we might as well replace all the bearings whilst its off the car. Another good friend is helping me with this as I wouldn't feel confident shimming it up and he also has a bearing induction heater which will make it easier to fit the bearings.
So hopefully in another week it will be back on its wheels for the first time this year.
Im looking forward to a clean painted shell as then the reassembly can start which is the best part of the project, although there are still lots of parts that require rebuilding and painting before being fitted.
I will try to get the hard to reach areas with my small spray gun when this paint has had a day to dry and if there are any bits left then I will have to resort to a brush.
Next on the list is get the axle back together, hopefully the shims will arrive soon, we were only going to replace the hub bearings but decided at the last minute that we might as well replace all the bearings whilst its off the car. Another good friend is helping me with this as I wouldn't feel confident shimming it up and he also has a bearing induction heater which will make it easier to fit the bearings.
So hopefully in another week it will be back on its wheels for the first time this year.
Dave Pearce
Oily Rag Classics
Jensen FF 119/133
Jensen FF 119/182
Jensen Interceptor III 128/4430
Oily Rag Classics
Jensen FF 119/133
Jensen FF 119/182
Jensen Interceptor III 128/4430
Re: Restoration of 128/4430
The rear axle is now rebuilt and waiting to go back on the car, the delay now is with the rear shackle bushes being too small, my supplier has promised replacements in the post. So after the delays in getting the springs fitted because there seemed to be a problem somewhere but it turned out that they are not easy to fit and you just have to force them in I still cannot fit the axle.
Here are some photos of the axle stripped and cleaned ready for reassembly, the bearing induction heater we used which is a great piece of kit when carrying out this type of work and finally the axle assembled and painted.
Thanks to Wayne for helping strip and rebuild the axle and bringing all the pullers and bearing heater.
Dave Pearce
Oily Rag Classics
Jensen FF 119/133
Jensen FF 119/182
Jensen Interceptor III 128/4430
Oily Rag Classics
Jensen FF 119/133
Jensen FF 119/182
Jensen Interceptor III 128/4430
Re: Restoration of 128/4430
Thats going to be one hell of a car if you keep with the current level of detail & care.
I genuinly take my hat off to you (& wish I could do that!)
well done & keep going!
I genuinly take my hat off to you (& wish I could do that!)
well done & keep going!
Re: Restoration of 128/4430
Darren Barnes
Early Int. INT203449
541 541/905633
Early Int. INT203449
541 541/905633
Re: Restoration of 128/4430
Thanks Tim but I am lucky that i have plenty of room to work in and I can make as much mess as I like, I also have some good friends who are excellent in their respective trades who I can call on for help, advice and borrow a few tools.
The rest is just down to how much labour you are willing to put in, for example that rear axle was steam cleaned externally and all the rust removed with a wire wheel on a grinder when it was removed months ago but when we decided to pull the diff and replace all the bearings and not just the rear hubs and seals I steam cleaned it again inside and out and spent another 2 hours with the wire brush on the grinder. Then it was primed with ferrozinc and steam cleaned again before reassembly once back together it could be supported on the halfshafts for final painting (the diff cover was painted separately so it can be removed without damaging the paint).
All in ive probably got at least a full day in prepping and painting the axle.
If you think that was fussy look what I did to my new springs

The advantage I have is my time is not costed into the restoration unlike a professional job where they cannot justify the labour required to do this.
Just because I am trying to get the best finish on the car even on parts that most people will never see I am not building a show queen here and fully intend to put some miles on this car when finished.
The temperature display is from a probe attached to the bearing, you just preset the required temperature and it stops automatically and can heat a bearing to 250 degrees C, just remember to wear the special gloves supplied before picking up the bearing.
The rest is just down to how much labour you are willing to put in, for example that rear axle was steam cleaned externally and all the rust removed with a wire wheel on a grinder when it was removed months ago but when we decided to pull the diff and replace all the bearings and not just the rear hubs and seals I steam cleaned it again inside and out and spent another 2 hours with the wire brush on the grinder. Then it was primed with ferrozinc and steam cleaned again before reassembly once back together it could be supported on the halfshafts for final painting (the diff cover was painted separately so it can be removed without damaging the paint).
All in ive probably got at least a full day in prepping and painting the axle.
If you think that was fussy look what I did to my new springs
The advantage I have is my time is not costed into the restoration unlike a professional job where they cannot justify the labour required to do this.
Just because I am trying to get the best finish on the car even on parts that most people will never see I am not building a show queen here and fully intend to put some miles on this car when finished.
R2D2 is an induction bearing heater and we are preheating the bearings to 140 degrees C so they just drop onto the shafts and don't require the stress on the bearing that normal fitting methods entail.What is R2 D2 doing with the bearing Dave?
The temperature display is from a probe attached to the bearing, you just preset the required temperature and it stops automatically and can heat a bearing to 250 degrees C, just remember to wear the special gloves supplied before picking up the bearing.
Dave Pearce
Oily Rag Classics
Jensen FF 119/133
Jensen FF 119/182
Jensen Interceptor III 128/4430
Oily Rag Classics
Jensen FF 119/133
Jensen FF 119/182
Jensen Interceptor III 128/4430
Re: Restoration of 128/4430
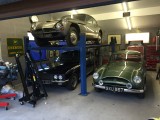
I have finally got the car off the lift and on its own wheels now. The rebuilt axle and rear suspension were refitted today and apart from a bit of messing about to get the axle in position whilst working on my own it only took a couple of hours to fit the axle and springs.
Work is complete under the car for now and I have a few small jobs to finish before it goes for paint like checking the front bumper fits, stripping the bonnet and cleaning out all the gunk from the inside of the doors.


Work is complete under the car for now and I have a few small jobs to finish before it goes for paint like checking the front bumper fits, stripping the bonnet and cleaning out all the gunk from the inside of the doors.
Dave Pearce
Oily Rag Classics
Jensen FF 119/133
Jensen FF 119/182
Jensen Interceptor III 128/4430
Oily Rag Classics
Jensen FF 119/133
Jensen FF 119/182
Jensen Interceptor III 128/4430

Re: Restoration of 128/4430
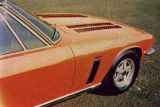
wow! almost too nice to drive.
Felix Kistler
C-V8 112/2454, 541DL 2223849
JOC 9465
Secretary/VP JCC Jensen Car Club of Switzerland
www.jcc.ch / office@jcc.ch
C-V8 112/2454, 541DL 2223849
JOC 9465
Secretary/VP JCC Jensen Car Club of Switzerland
www.jcc.ch / office@jcc.ch
-
colin7673
- now normal...
- Posts: 4637
- Joined: Tue Jan 10, 2006 11:54 am
- Location: Spalding Lincolnshire
- Contact:
Re: Restoration of 128/4430
Dave
Fantastic.
But I would like to ask one question.
With all the new metal that is now in the car and all the time and effort making this car better than new, did you think about having the body galvanized or would the cost been too much?
Fantastic.
But I would like to ask one question.
With all the new metal that is now in the car and all the time and effort making this car better than new, did you think about having the body galvanized or would the cost been too much?
Only working half a day now.
http://www.jensensontour.co.uk
http://www.jensensontour.co.uk
Re: Restoration of 128/4430
I gave lots of thought to various metalwork preparation and protection when I started this job and thought about having the shell chemically dipped and coated but didn't want to risk the possibility of any chemicals left in crevices causing more corrosion and I have heard stories of the shells being dented as they are handled.
My next thought was to have the shell shotblasted or soda blasted but by the time we were on with the job much of the paint on the body panels had been removed with a DA sander to assess to extent of the rust and start making the repairs. The other problem with blasting is it will not remove underseal so this would have still needed to be removed the hard way.
It has been hard work cleaning and painting the shell but the advantages of doing it this way are its cheaper, it can be done a section at a time and protected to stop flash rusting and I have been able to carry out this work whilst the bodywork was being carried out.
The dipping or shotblasting would have needed a completely stripped shell but as I am impatient I had the welding started a couple of weeks after I started stripping the car and I continued to strip the car as Geff & Brian needed access to carry out the bodywork.
If I was starting again I think I would still carry out the work this way but have a couple of months stripping the car before the bodywork is started, this way I would have most of the car stripped and not rushing as much. I should have also decided to remove every last nut and bolt at the start as I thought I would leave bits on the car but in the end everything was removed. I should have expected this though as although I was looking for a rolling restoration project originally, when I bought this car for a full restoration my wife said she knew this was what would happen and she was right.
Dave Pearce
Oily Rag Classics
Jensen FF 119/133
Jensen FF 119/182
Jensen Interceptor III 128/4430
Oily Rag Classics
Jensen FF 119/133
Jensen FF 119/182
Jensen Interceptor III 128/4430
Re: Restoration of 128/4430
Fantastic to see the degree of detailing !
Notice what looks like Spax shocks on the rear - which is what I put on mine to start with - and then spent a long time searching for a rattle noise. Because of a problem with clearance between rear wheels & body I took the advice given elsewhere on this site and installed coil-overs which I am very happy with. Installing these also solved the rattle noise - one of the plastic covers on the Spax shocks had come loose, causing the rattle.
By the way, I had my car soda blasted (engine bay/interior)
This gave a very good result although it did not remove all glue residues inside the car so quite some manual work had to be done. A drawback is the amount of dust getting in every nook & cranny, so a lot of cleaning up was needed.
Stig Jensen
JOC 9768
-----------
'20 Audi A4 2,0 T Quattro
'89 Porsche 964 C4
'98 RR 4,6 HSE, modified for offroad use
'73 Int III J, near n & b job completed 2013
JOC 9768
-----------
'20 Audi A4 2,0 T Quattro
'89 Porsche 964 C4
'98 RR 4,6 HSE, modified for offroad use
'73 Int III J, near n & b job completed 2013
Re: Restoration of 128/4430
The porous surface of the inner wings underneeth is the result of corrosion treatment, or rust damage?
Love classic cars!
Re: Restoration of 128/4430
Rust on my carThe porous surface of the inner wings underneeth is the result of corrosion treatment, or rust damage?

The finish is Schultz applied with an air gun which is meant to give this finish.
Dave Pearce
Oily Rag Classics
Jensen FF 119/133
Jensen FF 119/182
Jensen Interceptor III 128/4430
Oily Rag Classics
Jensen FF 119/133
Jensen FF 119/182
Jensen Interceptor III 128/4430
-
Trevithick

- Posts: 1963
- Joined: Thu Jun 09, 2011 6:47 pm
- Location: Wild West Cornwall
- Contact:
Re: Restoration of 128/4430
I'm looking forward to seeing this gem when it's finished.
SP 131/4980.
Back soon.
Back soon.