Kenny38
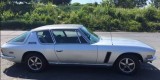
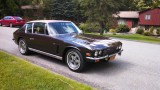
My New Interceptor - '72 Mk 111, 133-5597
Re: My new Interceptor - '72 Mk 111, 133-5597
Hi Rocky. Sorry ....hood at front. Know the feeling from the distant pass when the girls would slide up to me and demand i show "The Power". It looked like it didn't fit. The bonnet i mean. But just in case do some knees bend and adjust your pants a little to the left.
Kenny38
Kenny38
Re: My new Interceptor - '72 Mk 111, 133-5597
So I started out on a "5 minute" project to try and pop out the headrests...
This turned into a big struggle because of the "one way only" spring that lets the headrest go in, but not come out.
Then, after I climbed into (and out of) the back seat, I noted my driver's seat would not slide back as far as it used to!
Then, I realized the reason the seat wouldn't go back was because the hex bolt wasn't sliding back through the seat track, because it had turned about 20* to the side...
This resulted in me pulling out the driver's seat, grinding the bolt heads down to 10mm so I can get a wrench on them in the future, retapping all the bolt holes, and cleaning and re-greasing all the seat track....
Why did I do all this??? I don't really know, but my seat moves forward and backwards much more smoothly now!
Anyway - a few pictures for your enjoyment...
- New 10mm Grade 8 Seat Retaining Bolt, Modified to Fit Through the Track Slider
- IMG_0150 (Large).JPG (128.88 KiB) Viewed 5350 times
- Dakota Digital Speedo Drive under the Driver's Seat
- IMG_0149 (Large).JPG (125.75 KiB) Viewed 5350 times
- What Started it - Sway Bar Parts...
- IMG_0146 (Large).JPG (122.83 KiB) Viewed 5350 times
‘71 TVR Vixen 2500 - (M Series Tribute)
'72 Interceptor III - 133/5597
'73 DeTomaso Pantera
'74 Toyota Land Cruiser FJ-40
'95 Jaguar XJS Convertible
'72 Interceptor III - 133/5597
'73 DeTomaso Pantera
'74 Toyota Land Cruiser FJ-40
'95 Jaguar XJS Convertible
Re: My new Interceptor - '72 Mk 111, 133-5597
They are supposed to be Allen Headed bolts in those seat runners Rocky .. that was your problem there
.. that was your problem there Manual Int&Rag-Top
"Monkey Man"sig Registrar

"Monkey Man"sig Registrar
-
slotcarone
- Posts: 1666
- Joined: Sun Aug 29, 2010 1:38 pm
Re: My new Interceptor - '72 Mk 111, 133-5597
Just looked at my unrestored car and yes they are allen head bolts. Funny they are black on the drivers side and silver on the passenger side. Probably changed at some point? 
1972 Interceptor III
133-5612
133-5612
Re: My new Interceptor - '72 Mk 111, 133-5597
Yes, I was just too lazy to drive over to the Ace Hardware for two bolts.... Don't tell anyone I made this modification away from originality!

‘71 TVR Vixen 2500 - (M Series Tribute)
'72 Interceptor III - 133/5597
'73 DeTomaso Pantera
'74 Toyota Land Cruiser FJ-40
'95 Jaguar XJS Convertible
'72 Interceptor III - 133/5597
'73 DeTomaso Pantera
'74 Toyota Land Cruiser FJ-40
'95 Jaguar XJS Convertible
Re: My new Interceptor - '72 Mk 111, 133-5597 - Door Trim
I have this problem with some rust pitting on my door trim end-cap.
I was told in no uncertain terms by members of this community that they must be chrome, or a chrome-like finish.
That being said - what does the collective membership think the best way to prepare this for a chrome paint application? Fine sandpaper? Sandblasting? other techniques?
I don't have c chrome shop I trust locally, and would rather hold off on chroming all my trim as this is the only piece in bad shape. Thanks
Rocky
- IMG_0378 (Large).JPG (133.16 KiB) Viewed 5229 times
- IMG_0379 (Large).JPG (119.89 KiB) Viewed 5229 times
‘71 TVR Vixen 2500 - (M Series Tribute)
'72 Interceptor III - 133/5597
'73 DeTomaso Pantera
'74 Toyota Land Cruiser FJ-40
'95 Jaguar XJS Convertible
'72 Interceptor III - 133/5597
'73 DeTomaso Pantera
'74 Toyota Land Cruiser FJ-40
'95 Jaguar XJS Convertible
-
cannonball
- Posts: 2979
- Joined: Mon Dec 11, 2006 11:08 pm
- Location: CREWE
Re: My new Interceptor - '72 Mk 111, 133-5597
Rockey
if the rest are in good cond don't spoil it by painting that one ring Rejen they have good used ones in stock, its worth spending on surely ..
if the rest are in good cond don't spoil it by painting that one ring Rejen they have good used ones in stock, its worth spending on surely ..
WATTS RACING TRANSMISSIONS, 07974 088375,
CLOBBER THE COMPETITION
CLOBBER THE COMPETITION
Re: My new Interceptor - '72 Mk 111, 133-5597
Hello Rocky 
I agree with Duncan if you can get a good 2nd hand one.. anything is better than Chrome paint
If you don't want to get another one and want a quick fix... then... soak your original one in some phosphoric acid.. ie Coca-Cola.. that will kill the rust, then polish it with some really fine grade wire wool ie "0000" grade with some metal polish on it, ie we have AutoSol, of you could use a polish than comes on fine wire wool .. ie "Brasso" >> https://www.amazon.co.uk/Brasso-Metal-P ... VFYHAAF0YQ" onclick="window.open(this.href);return false;
Then when it is all shiny clean it with some thinners and give it a coat of Clear Laquer.. I think you may be surprised how good it looks, but.. the time you've done that you may aswell just get it chromed really, but the above is another option for you My Ole Fruit Bat
I agree with Duncan if you can get a good 2nd hand one.. anything is better than Chrome paint
If you don't want to get another one and want a quick fix... then... soak your original one in some phosphoric acid.. ie Coca-Cola.. that will kill the rust, then polish it with some really fine grade wire wool ie "0000" grade with some metal polish on it, ie we have AutoSol, of you could use a polish than comes on fine wire wool .. ie "Brasso" >> https://www.amazon.co.uk/Brasso-Metal-P ... VFYHAAF0YQ" onclick="window.open(this.href);return false;
Then when it is all shiny clean it with some thinners and give it a coat of Clear Laquer
.. I think you may be surprised how good it looks, but.. the time you've done that you may aswell just get it chromed really, but the above is another option for you My Ole Fruit BatManual Int&Rag-Top
"Monkey Man"sig Registrar
"Monkey Man"sig Registrar
Re: My new Interceptor - '72 Mk 111, 133-5597
Thanks for the sage advice - just what I look for on this board!
Rocky
Rocky
‘71 TVR Vixen 2500 - (M Series Tribute)
'72 Interceptor III - 133/5597
'73 DeTomaso Pantera
'74 Toyota Land Cruiser FJ-40
'95 Jaguar XJS Convertible
'72 Interceptor III - 133/5597
'73 DeTomaso Pantera
'74 Toyota Land Cruiser FJ-40
'95 Jaguar XJS Convertible
Re: My new Interceptor - '72 Mk 111, 133-5597
So you can read about my fuel pressure travails in this thread...
https://www.joc.org.uk/forum/viewtopic. ... 01&start=0
Bottom line is, I need to do some work on my fuel system. I got a new mechanical pump and pushrod from Mancini Racing (Carter M6903 - see the thread) and installed it.
Then, after looking at the rubber fuel lines, and seeing them all cracked (after install in 2016), I thought to myself... "Why not install stainless steel hard lines all the way back to the fuel tank? What could be easier?"
Well - it turns out, a lot of things could be easier than this project. It has been a b**ch!
It is very hard to bend SS tubing in the confined spaces of a Jensen Interceptor engine bay!
Anyway - the forward lines are run all the way back to the diff. All the bends are done, and the lines are secured, and covered with rubber on any fuel-line to metal contact points, and insulated in any areas where the heat is going to cause any issues. The return line is not insulated, as that is just dumping gas back to the tank.
I wish my pictures were more flattering.
Rocky
- Engine & Fuel Pressure Gauge
- Engine_and_Fuel_Pressure_Gauge (Large).JPG (196.29 KiB) Viewed 5036 times
- Pump, Hardlines & Return
- DSC01509 (Large).JPG (160.01 KiB) Viewed 5185 times
Last edited by RockyUSA on Wed Mar 20, 2019 4:15 am, edited 3 times in total.
‘71 TVR Vixen 2500 - (M Series Tribute)
'72 Interceptor III - 133/5597
'73 DeTomaso Pantera
'74 Toyota Land Cruiser FJ-40
'95 Jaguar XJS Convertible
'72 Interceptor III - 133/5597
'73 DeTomaso Pantera
'74 Toyota Land Cruiser FJ-40
'95 Jaguar XJS Convertible
Re: My new Interceptor - '72 Mk 111, 133-5597
More pictures.
I am happy to report that with my new fuel pump pushrod / pump / hardline supply & return I have solved the "intermittent lean spikes" problem on my A/F gauge.
I am also excited to have finished up this project. It was quite the challenge to bend the lines and fit them with the engine & transmission installed.
Here's a couple more pictures...
- Fuel Pump & Return
- 03-16-2019 (Large) (10).JPG (159.69 KiB) Viewed 5112 times
- Lines Going Forward
- 03-16-2019 (Large) (7).JPG (204.72 KiB) Viewed 5112 times
- Lines & Restraints
- 03-16-2019 (Large) (6).JPG (195.24 KiB) Viewed 5112 times
- Fuel Pickup
- 03-16-2019 (Large) (5).JPG (168.69 KiB) Viewed 5112 times
‘71 TVR Vixen 2500 - (M Series Tribute)
'72 Interceptor III - 133/5597
'73 DeTomaso Pantera
'74 Toyota Land Cruiser FJ-40
'95 Jaguar XJS Convertible
'72 Interceptor III - 133/5597
'73 DeTomaso Pantera
'74 Toyota Land Cruiser FJ-40
'95 Jaguar XJS Convertible

Re: My new Interceptor - '72 Mk 111, 133-5597
Hi Rocky,
Why did you use SS rather than copper or nickel copper that is easy to bend?
Regards
John
Why did you use SS rather than copper or nickel copper that is easy to bend?
Regards
John
Re: My new Interceptor - '72 Mk 111, 133-5597
If I knew then, what I know now, I might have taken a different route.....
Who would’ve thought that making tight, accurate bends in 3/8” SS tubing (in the engine compartment, with all the s*** in your way) could be such an adventure?
Rocky
PS - I will say that I do feel the engine runs smoother - maybe it's wishful thinking, but maybe not. I have been driving it about 50 miles a day for the last couple days, and it's a joy to be back in my car!
‘71 TVR Vixen 2500 - (M Series Tribute)
'72 Interceptor III - 133/5597
'73 DeTomaso Pantera
'74 Toyota Land Cruiser FJ-40
'95 Jaguar XJS Convertible
'72 Interceptor III - 133/5597
'73 DeTomaso Pantera
'74 Toyota Land Cruiser FJ-40
'95 Jaguar XJS Convertible
Re: My new Interceptor - '72 Mk 111, 133-5597
My Bumper was a little wiggly, and one of the end bolts had fallen out.
Little did I know a 15 minute job to replace a standard bolt would turn into a 3-4 hour effort, requiring removal of the bumper, cleaning, welding, and retapping all the holes.
Anyway - the project continues..
I cleaned up my tailpipes, and am polishing the bumper. I fabricated a replacement retaining nut in the bumper retainer tube, and cleaned off all the exhaust soot along the coachwork and brightwork.
Here's a few initial pictures....
- Old Tailpipe
- DSC01660 (Large).JPG (83.48 KiB) Viewed 4870 times
- Polished Tailpipe
- DSC01659 (Large).JPG (83.83 KiB) Viewed 4870 times
- Retaining nut welded in bumper tube and ground down for paint
- DSC01663 (Large).JPG (117.83 KiB) Viewed 4870 times
‘71 TVR Vixen 2500 - (M Series Tribute)
'72 Interceptor III - 133/5597
'73 DeTomaso Pantera
'74 Toyota Land Cruiser FJ-40
'95 Jaguar XJS Convertible
'72 Interceptor III - 133/5597
'73 DeTomaso Pantera
'74 Toyota Land Cruiser FJ-40
'95 Jaguar XJS Convertible
Re: My new Interceptor - '72 Mk 111, 133-5597
Sitting here at my cabin last night, I didn’t have much to do, so I decided to polish my bumper.
I hope the picture does it justice.
I may have some trouble posting a picture from here due to Wig Internet service. But I promise I will get a picture or two up shortly.
Rocky
I hope the picture does it justice.
I may have some trouble posting a picture from here due to Wig Internet service. But I promise I will get a picture or two up shortly.
Rocky
- 107C9ECC-FA5E-4314-9CA3-518DDE896EED.jpeg (287.45 KiB) Viewed 4788 times
‘71 TVR Vixen 2500 - (M Series Tribute)
'72 Interceptor III - 133/5597
'73 DeTomaso Pantera
'74 Toyota Land Cruiser FJ-40
'95 Jaguar XJS Convertible
'72 Interceptor III - 133/5597
'73 DeTomaso Pantera
'74 Toyota Land Cruiser FJ-40
'95 Jaguar XJS Convertible